Looking For Something in this Blog? Search here

Tuesday, March 25, 2014

DISCONTINUING AN IV INFUSION

DISCONTINUING AN IV INFUSION  

1. Verify written doctor’s order to discontinue IV including IV medicines.

2. Observe ten (10) Rs.

3. Assess and inform the patient of thediscontinuation of IV infusion & of anymedicine.

4. Prepare the necessary materials: IV tray or injection tray with sterile cottonballs with alcohol, plaster, pick-up forceps in antiseptic solution, kidneybasin, Band-Aid.

5. Wash hands before and after procedure.

6. Close the roller clamp of the IVadministration set.

7. Moisten adhesive tapes around the IV catheter with cotton ball withalcohol; remove plaster gently.

8. Use pick-up forceps to get cotton ball with alcohol and without applyingpressure, remove needle or IV catheter then immediately apply pressureover the venipuncture site.

9. Inspect IV catheter for completeness.

10. Place dressing over the venipuncture site.

11. Discard all waste materials including the IV cannula according to HealthCare Waste Management (DOH/DENR).

12. Reassure patient.


13. Document time of discontinuance, status ofinsertion site and integrity of IV catheter andendorse accordingly.

CHANGING AN IV SOLUTION

1               CHANGING AN IV SOLUTION

           1. Verify doctor’s prescription in doctor’s order sheet; countercheck IV label,IV card, infusate                sequence, type, amount, additives (if any), duration ofinfusion.

2. Observe ten (10) Rs.

3. Explain procedure to reassure patient &significant others & assess IV site forredness, swelling, pain, etc.

4. Change IV tubings and cannula if 48-72hours lapsed after IV insertion.

5. Wash hands before and after the procedure.

6. Prepare necessary materials; place on IV tray.

7. Check sterility and integrity of IV solution.

8. Place IV label on the IV bottle.

9. Calibrate new IV bottle according to duration ofinfusion as per prescription.

10. Open and disinfect rubber port of IV solution tofollow.

11. Close the roller clamp and spike thecontainer aseptically.

12. Regulate the flow rate based on theprescribed infusion rate of infusion.Expel air bubbles (if any).

13. Reiterate assurance to patient and significant others.

14. Discard all waste materials according to Health Care Waste Management.

15. Document and endorse accordingly.


Sunday, March 23, 2014

INSERTING IV CANNULA

1. Verify the written prescription for IV therapycheck prepared IVF and other thingsneeded.
2. Explain procedure to reassure the patient &significant others and observe the 10Rs.
3. Do hand hygiene before and after theprocedure.
4. Choose site for IV.
5. Apply tourniquet 5 to 12 cm. (2-6inches) above injection sitedepending on condition of patient.
7. Prepare site with effective topicalantiseptic according to hospital policy or cotton balls with alcohol in circularmotion and allow 30 seconds to dry.(No touch technique.)

Note: CDC Universal Precaution: Always wear gloves when doing anyvenipuncture.

8. Using the appropriate IV cannula, pierceskin with needle positioned on a 15-30degree angle.
9. Upon flashback visualizationdecrease the angle, advancethe catheter and stylet (1/4inch) into the vein, check if tipof catheter can be rotatedfreely inside the vein.
10. Position the IV catheter parallel tothe skin. Hold stylet stationary andslowly advance the catheter until thehub is 1mm to the puncture site.
11. Slip a sterile gauze under the hub. Release the tourniquet, remove thestylet while applying digital pressure over the catheter with one fingerabout 1-2 inch from the tip of the inserted catheter.
12. Connect the infusion tubing of theprepared IVF aseptically to the IVcatheter.
Note: When steel-winged needle (butterfly) is used:
A.Connect the IV tubing to the steel-winged needle connector &prime the needle with IV fluid.
B.Using the steel-winged needle, pierce skin with the needlebevel up , positioned on a 5-10 degree angle.
C.With steel-winged needle, parallel on the skin, enter the veindirectly and advance needle ¼ inch after successfullyperforming venipuncture. Check for backflow. Removetourniquet.
13. Open the clamp, regulate the flow rate.Reassure patient.
14. Anchor needle firmly in place with the use of :
a. transparent tape/dressing directly on the puncture site.
b. tape (using any appropriate anchoring style)


c. Band-Aid
Note: Never place unsterile tape directly on IV insertion site, instead placea small piece of sterile OS & then secure it with adhesive tape.
15. Tape a small loop of IV tubing for additional anchoring; apply splint (ifneeded).splint
16. Calibrate the IVF bottle & regulate flow of infusion according to prescribedduration.
17. Label on IV tape nearthe IV site to indicate thedate of insertion, typeand gauge of IV catheterand countersign.
18. Label with plaster on the IV tubing to indicate the datewhen to change the IV tubing.
 19. Observe patient and report any untoward effect.
20. Document in the patient’s chart and endorse to incomingshift.
21. Discard sharps and waste according to Health Care Waste Management(DOH/DENR).


SETTING UP AN IV INFUSION

1   1.      Verify written prescription and make IV label.

Name of Patient: ___________ Rm #: ___
IVF Fluids: ________________________Bottle #: __________
Flow Rate: _______Drug Incorporation: __________________
Date & Time Started: _________________
Date & Time to consume: _____________
NOD: ____________________________


2. Observe ten (10) Rs when preparing & administering IVF.

10 Golden Rules for Administering Drug Safely
(from Nursing 88 Vol. 18, August 1988)
a.Administer the
RIGHT DRUG
.
b.Administer the right drug to the
RIGHT PATIENT
.
c.Administer the
RIGHT DOSE.

d.Administer the right drug by the
RIGHT ROUTE
.
e.Administer the right drug at the
RIGHT TIME
.
f.DOCUMENTeach drug you administer.
g.TEACH
your client about the drugs he is receiving.
h.Take a complete patientDRUG HISTORY
. (There is a risk of adverse drugreactions when a number of drugs are taken or when patient is taking alcoholdrinks.)
i.Find out if the patient has any
DRUG ALLERGIES
 j.Be aware of potential DRUG – DRUG or
DRUG – FOOD INTERACTIONS.
Toprotect your patient and your license, follow these guidelines for avoidingmedication errors

3. Explain procedure to reassure patient and/or significantothers, secure consent, if necessary.


 4. Assess patient’s vein; choose appropriate site location, size and condition

5. Do hand hygiene before and after the procedure

6. Prepare necessary materials for procedure

  • V tray with IV solution
  • IV Administration Set                             


IV CANNULA
 

  • forceps soaked in antiseptic solution
  • alcohol swabs or cotton balls soaked in alcohol with cover (this should be exclusivelyused for IV)
  • plaster
  • tourniquet
  • gloves
  • splint
  • IV hook
  • sterile 2x2 gauze or transparent dressing.

7. Check the sterility and integrity of the IV solution, IV set and other devices.

8. Place IV label on IVF bottle duly signed by RN whoprepared it (patient’s name, room no., solution, drugincorporation, bottle sequence, and duration, time, anddate.

9. Open the seal of the IV infusion aseptically anddisinfect rubber port with cotton ball with alcohol.

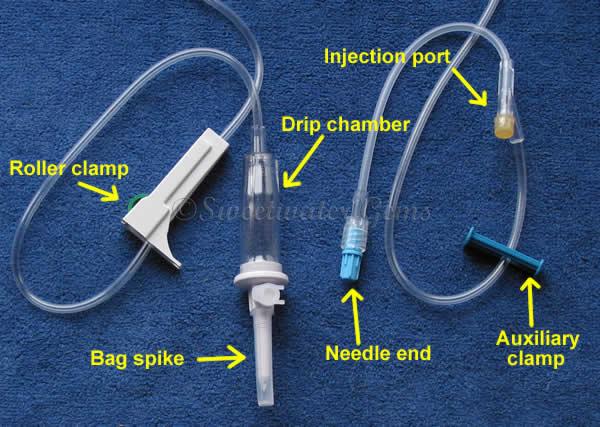
10. Open the IV administration setaseptically and close the rollerclamp and spike the infusatecontainer aseptically.

11. Fill drip chamber to at least half and prime it withIV fluid aseptically.

12. Expel air bubble if any and put back the cover to thedistal end of the IV set (get ready for IV insertion).


Get Website Traffic